Next.js SSG 블로그에 서버리스 댓글 API 연동하기
swhan
SSG(Static Site Generation) 방식으로 빌드 된 Next.js 블로그에 Cloudflare Workers 기반 댓글 API를 연동하는 과정을 소개합니다.
들어가며
이전 포스팅에서 Workers KV, Worker API Gateway를 이용해서 서버리스 방식의 블로그 댓글 API를 설계했으니, 이제 SSG 빌드 된 저희 블로그에 어떻게 적용해야 하는지 알아보겠습니다.
기초 작업
클라이언트 측에서 Fetch 함수를 이용해 댓글 API 서버로 요청을 보내야 하는 구조니까 두 개의 요소들로 나눠서 만들도록 하겠습니다.
-
CommentsService: 댓글 생성(create), 댓글 가져오기(list), 댓글 ID를 관리할 Class
-
CommentsWidget: 댓글 기능을 담당하는 Client Components
CommentsService
CommentsService는 댓글 API와 통신할 때 사용할 추상화 계층입니다.
댓글 타입 먼저 선언하고, API 호출 시 사용되는 고정 값들과 class 내부가 어떻게 구현되었는지 하나씩 살펴보겠습니다. 빠른 이해를 위해 class 내부 변수들을 미리 넣어놨으니 각자 편하신 방법으로 초기화 방법 바꿔서 사용하시면 됩니다.
// src/lib/comments.ts
export type Comment = {
  id: string; // 댓글 id
  data: string;
  createdAt: string;
};

export type ListComments = {
  postId: string;
  comments: Comment[];
  page: {
    has_more: boolean;
    next_cursor?: string;
  };
};

export class CommentsService {
  private HOST_NAME = "http://localhost:8787";
  private PATH = "/comments";
  private COOKIE_DOMAIN = "localhost";
  private SESSION_ID: string | undefined = undefined;
  private LIMIT = 5;

  constructor() {}
  ...
}
SessionId
저는 API 서버 측에서 간단한 유효성 검사에 사용할 수 있도록 세션 ID를 댓글 ID로 사용하려고 하는데요, 세션 ID 생성 및 브라우저 쿠키 등록까지 한 번에 할 수 있도록 구현하겠습니다.
export class CommentsService {
  ...
  sessionId() {
    if (!this.SESSION_ID) {
      this.SESSION_ID = crypto.randomUUID().replace(/\-/g, "");
      document.cookie = `sid=${this.SESSION_ID}; Domain=${this.COOKIE_DOMAIN}; Path=/; Max-Age=86400; SameSite=Lax; Secure`;
    }
    return this.SESSION_ID;
  }
}
댓글 가져오기
가져올 댓글 수는 동적으로 변경되는 것보다 고정 값으로 처리하는 게 구현하기 편해서 class 내부에 미리 선언해놓은 기본값인 5개를 사용하겠습니다.
export class CommentsService {
  ...
  async list(input: { postId: string; cursor?: string }): Promise<ListComments> {
    const { postId, cursor } = input;

    const url = new URL(this.HOST_NAME + `${this.PATH}/${postId}`);
    url.searchParams.set("limit", String(this.LIMIT));

    if (cursor) url.searchParams.set("cursor", cursor);

    const res = await fetch(url, {
      method: "GET",
      mode: "cors",
      cache: "no-cache",
      keepalive: true,
    });
    if (!res.ok) throw new Error(`Failed to load ${postId} comments`);

    return res.json();
  }
}
댓글 생성
create 함수는 comment 객체 내부는 건드리지 않고, 본질인 Fetch 요청에만 집중할 수 있도록 합니다.
export class CommentsService {
  ...
  async create(postId: string, comment: Comment): Promise<void> {
    const url = new URL(this.HOST_NAME + `${this.PATH}/${postId}`);
    const res = await fetch(url, {
      method: "POST",
      mode: "cors",
      credentials: "include", // 유효성 검사에 사용할 쿠키(sid) 필요
      cache: "no-cache",
      headers: {
        "Content-Type": "application/json; charset=utf-8",
      },
      body: JSON.stringify(comment),
    });
    if (!res.ok) throw new Error(`Failed to post ${postId} comments`);

    return;
  }
}
CommentsWidget
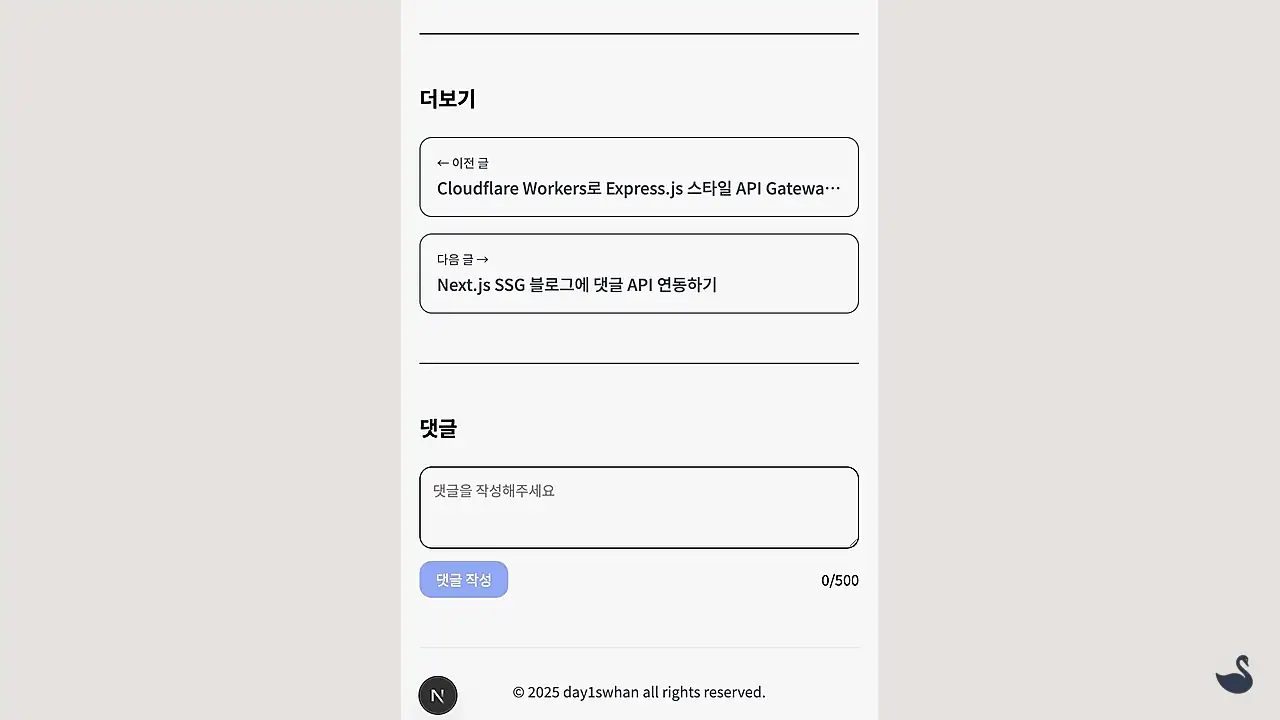
이제 CommentsService가 본연의 기능인 API 요청에만 집중할 수 있도록 컨트롤러이자, 유저 이벤트를 처리하고 보여줄 댓글 위젯을 만들어주겠습니다. 클라이언트 쪽에서 사용할 수 있도록 use client 선언하고, 레이아웃 잡아준 다음에 렌더링 된 화면부터 확인해 보겠습니다.
// src/app/_components/CommentsWidget.tsx
"use client";

export default function CommentsWidget({ slug }: { slug: string }) {
  ...
  return (
    <section>
      <hr className="my-12" />
      <p className="text-xl sm:text-2xl font-bold mb-6">댓글</p>
      <form onSubmit={onSubmit} className="grid gap-3 mb-6">
        <textarea
          className="p-3 border rounded-xl text-sm sm:text-base min-h-[80px] focus:outline-none focus:ring-2 focus:ring-blue-500"
          placeholder="댓글을 작성해주세요"
          maxLength={500}
          value={text}
          onChange={(e) => setText(e.target.value)}
        />
        <div className="text-sm flex items-center justify-between">
          <button
            disabled={!canSubmit}
            className="bg-blue-600 hover:bg-blue-700 text-white px-4 py-2 rounded-xl disabled:opacity-50 cursor-pointer"
          >
            댓글 작성
          </button>
          <span>{text.length}/500</span>
        </div>
      </form>

      {err && <ErrorMessage message={err} />}

      {/* List */}
      <ul className="space-y-4 text-sm sm:text-base mb-6">
        {items.map((c, index) => (
          <li key={index} className="p-4 border rounded-xl ">
            <div className="flex items-center gap-2 text-xs">
              <span className="font-medium">{c.id}</span>
              <span>•</span>
              <time title={c.createdAt}>{c.createdAt}</time>
            </div>
            <p className="mt-1 whitespace-pre-wrap">{c.data}</p>
          </li>
        ))}
        {loading && <SkeletonRows />}
      </ul>

      {hasMore && (
        <div>
          <button
            className="w-full text-sm sm:text-base font-medium border rounded-2xl py-2 cursor-pointer"
            onClick={() => load()}
            disabled={loading}
          >
            {loading ? "댓글 불러오는 중..." : "댓글 더보기"}
          </button>
        </div>
      )}
    </section>
  );
}
이제 조금 전에 만들었던 CommentsService 초기화해준 후, 댓글 작성을 담당하는 부분부터 확인해 보겠습니다.
// src/app/_components/CommentsWidget.tsx
"use client";
import { useEffect, useState } from "react";
import { CommentsService, Comment } from "@/lib/comments";

const commentsService = new CommentsService();

export default function CommentsWidget({ slug }: { slug: string }) {
  const [items, setItems] = useState<Comment[]>([]);
  const [cursor, setCursor] = useState<string | undefined>(undefined);
  const [hasMore, setHasMore] = useState<boolean>(true);

  const [loading, setLoading] = useState<boolean>(false);
  const [isSubmitting, setIsSubmitting] = useState(false);
  const [err, setErr] = useState<string | null>(null);

  const [text, setText] = useState<string>("");
  const canSubmit = text.trim().length > 0 && text.length <= 500;

  const makeKey = (c: Comment) => `${c.id}|${c.createdAt}`; // tmpKey

  ...
  const onSubmit = async (e: React.FormEvent) => {
    e.preventDefault();
    if (!canSubmit || isSubmitting) return;

    setErr(null);
    setIsSubmitting(true);

    const sid = commentsService.sessionId();
    const createdAt = new Date().toISOString().replace(/\.\d{3}Z$/, "Z");

    const comment: Comment = {
      id: sid.slice(0, 10),
      data: text,
      createdAt,
    };
    const tmpId = makeKey(comment);

    setItems((prev) => [comment, ...prev]); // optimistic prepend
    try {
      await commentsService.create(slug, comment);
      setText("");
    } catch (e: any) {
      setErr(e?.message ?? "댓글 작성 실패");
      setItems((prev) => {
        const comments = prev.filter((c) => makeKey(c) !== tmpId);
        return comments;
      });
    } finally {
      setIsSubmitting(false);
    }
  };
}
작성한 댓글을 가장 상위에 올려야 하니까 배열 맨 앞에 추가해 주시고, 댓글 생성에 실패했을 경우에는 목록에서 지워줘야 하는데 혹시 모를 충돌을 대비하기 위해서 commentId, createdAt을 이용한 tmpId 하나 만들어서 비교 후 날려주시면 됩니다.
이제 페이지 로딩 시 첫 댓글 목록, 추가 댓글 로딩을 담당하는 부분도 만들어주겠습니다.
// src/app/_components/CommentsWidget.tsx
...
export default function CommentsWidget({ slug }: { slug: string }) {
  ...
  const load = async () => {
    if (!hasMore || loading) return;
    setLoading(true);
    setErr(null);

    try {
      const { comments, page } = await commentsService.list({ postId: slug, cursor });
      setItems((prev) => {
        const next = [...prev];
        const seen = new Set(prev.map((c) => makeKey(c)));
        for (const c of comments) {
          const key = makeKey(c);
          if (!seen.has(key)) next.push(c);
        }
        return next;
      });
      setCursor(page.next_cursor);
      setHasMore(!!page.has_more);
    } catch (e: any) {
      setErr(e?.message ?? "댓글 가져오기 실패");
    } finally {
      setLoading(false);
    }
  };

  useEffect(() => {
    setItems([]);
    setCursor(undefined);
    setHasMore(true);
    setErr(null);
    load();
  }, [slug]);
  ...
}
보너스로 에러 메시지와, 댓글 로딩하는 동안 보여준 Skeleton UI Component도 추가해 주고
// src/app/_components/CommentsWidget.tsx
...
function ErrorMessage({ message }: { message: string }) {
  return <div className="my-6 text-sm border rounded-xl p-4 text-red-600 bg-red-50 border-red-200">{message}</div>;
}

function SkeletonRows() {
  return (
    <>
      {Array.from({ length: 3 }).map((_, i) => (
        <div key={i} className="animate-pulse border rounded-2xl p-3">
          <div className="h-3 w-1/4 bg-gray-200 rounded mb-2" />
          <div className="h-3 w-full bg-gray-200 rounded mb-1" />
          <div className="h-3 w-2/4 bg-gray-200 rounded" />
        </div>
      ))}
    </>
  );
}
정상 작동하는지 테스트용으로 댓글 4개 작성하면
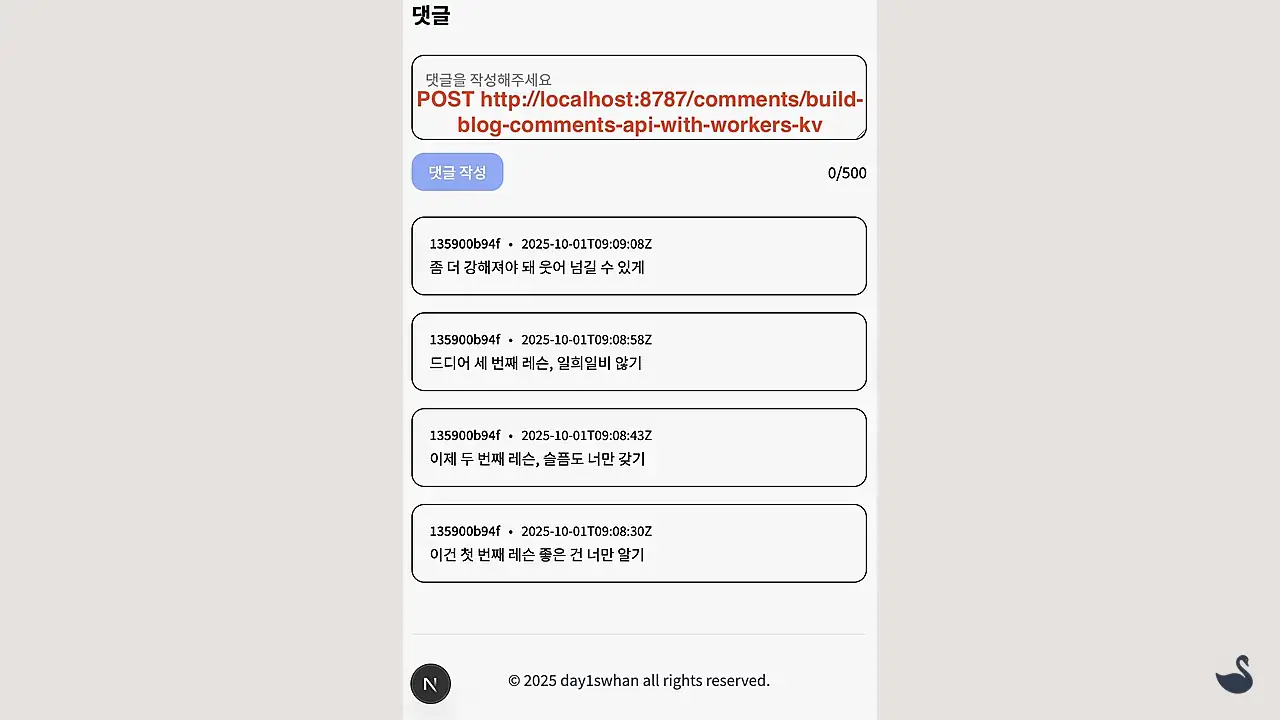
최신순으로 렌더링 되고, API 서버도 201 응답 잘 돌려줍니다. 이제 댓글 2개씩 나눠서 가져올 수 있도록 CommentsService에서 limit 값을 2로 초기화 후 새로고침 해보면
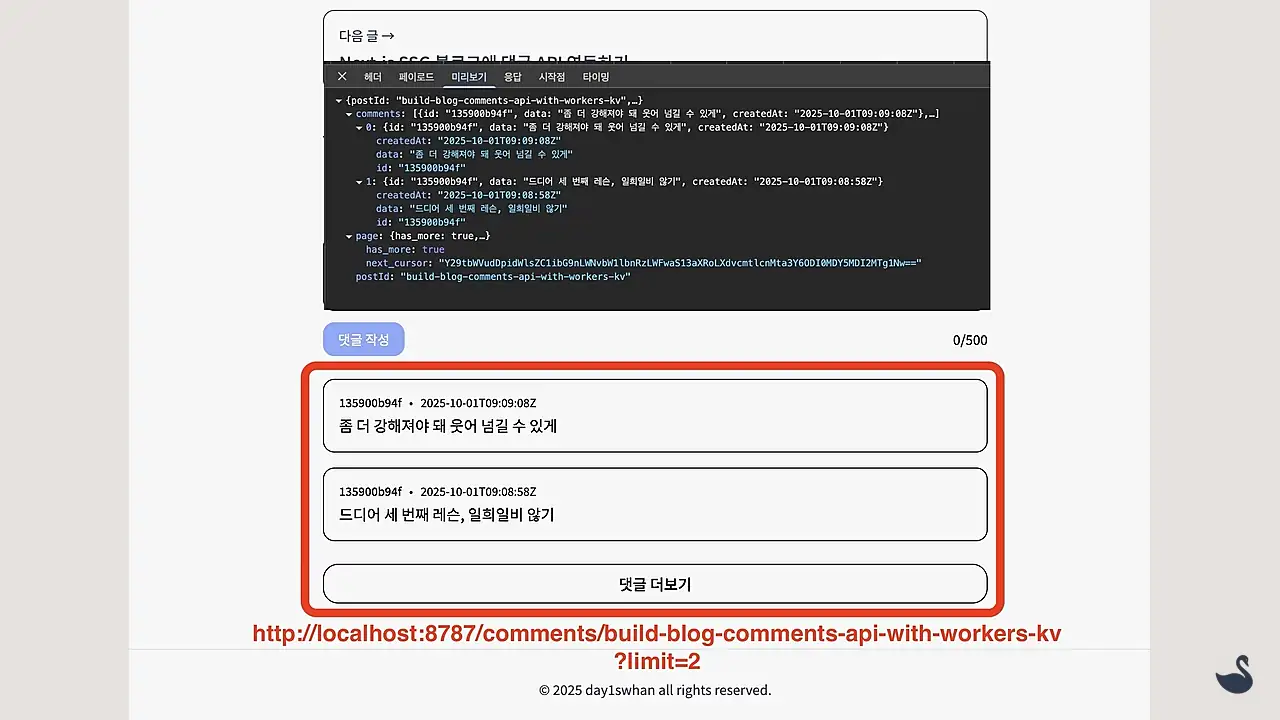
최신 댓글 2개, 다음 목록을 조회하기 위한 cursor, has_more 값들을 잘 가져오는데요, 더 보기 버튼 눌러보면
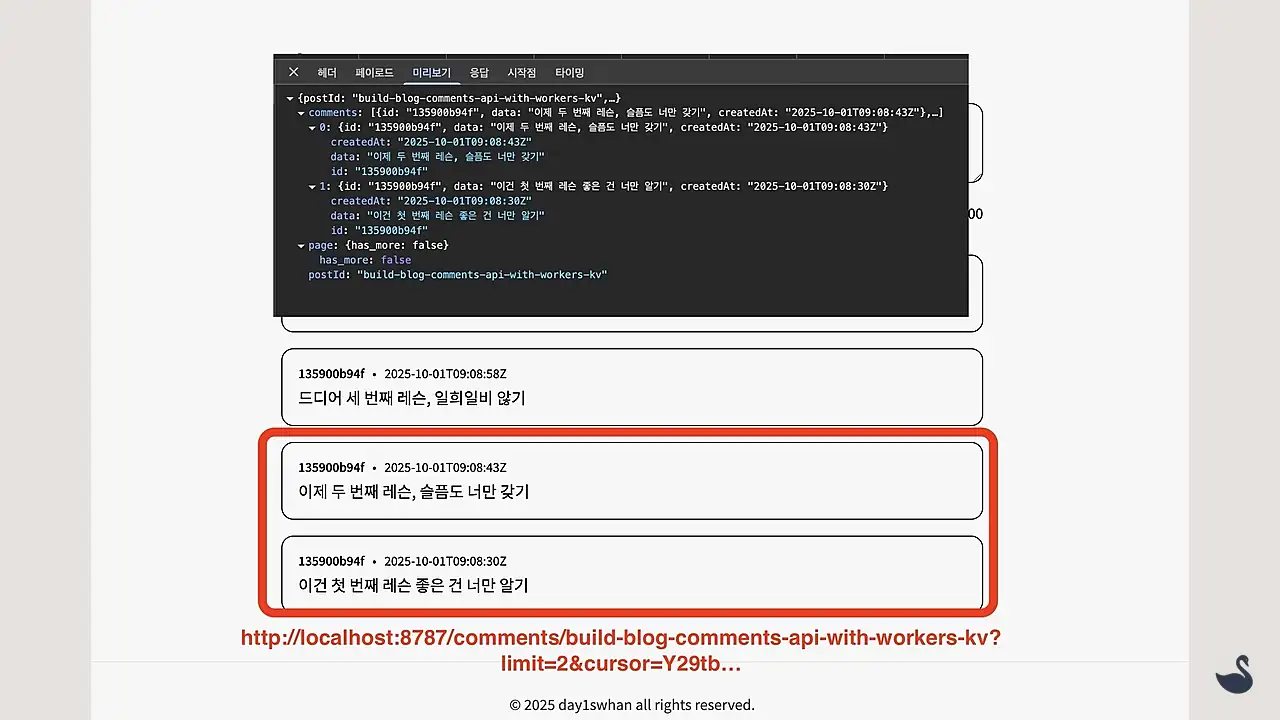
cursor 값 반영해서 다음 2개의 댓글도 가져오고, 이제 페이지 정보 없다는 has_more 값으로 false 넘어오면서 댓글 더 보기 버튼이 비활성화된 것을 보실 수 있습니다.
더보기
추천 컨텐츠
- #블로그 만들기 시리즈 #Cloudflare #마이크로서비스
서버리스 블로그 댓글 API 구축하기: Workers KV로 30분 만에 만들어보자
Workers KV를 이용한 서버리스 블로그 댓글 API 개발기를 공유합니다.
- #블로그 만들기 시리즈 #Cloudflare #마이크로서비스
Cloudflare Workers & KV 이용해서 서버리스 방문자 카운팅 API 만들기 (2/2)
쿠키 기반 중복 방문자 처리, 커스텀 도메인, CORS, 응답 캐싱 기능이 적용된 방문자 카운팅 API를 블로그에 적용하는 방법을 설명합니다.
- #블로그 만들기 시리즈 #Cloudflare #마이크로서비스
Cloudflare Workers & KV 이용해서 서버리스 방문자 카운팅 API 만들기 (1/2)
Cloudflare Workers, Workers KV를 이용해서 간단한 서버리스 방문자 카운팅 API 만드는 방법을 알아보겠습니다.
댓글